minecraft blender rig with mouth

Nick Jr. Team Up With Houses in Motion For A ‘Warm + Fuzzy’ Stop-Motion Package Create your online portofolio Give & receive feedback I agree with the terms of service. Kitchen Blender Westinghouse WBL1130PB 3d model Realistic Room 3d model dining table 3d model Wine Glass 3d model Morris Minor 1956 3d model magnifying glass 3d model C4 Bomb 3d model door pens 3d model toyota logo 3d model 3D Blender Models .obj 251 free blender 3d models. available in 3DS, BLEND, BVH, C4D, DAE, DDS, DXF, FBX, LWO, LWS, MAX, MTL, OBJ, SKP, SLDPRT, STL, or TGA format. +62 Royalty-free & commercial license premium Blender 3D Models over at CGStudio. 45 ACP Smith and Wesson HP Laptop High Poly Futuristic Transport Shuttle (Rigged ) Alienware 18 Gaming Laptop Spiderman Shattered Dimensions Ultimate Black Suit Spidey Borderlands 2 - Tiny Tina Busscar El Buss 340 Submachine Gun M24 R subaru wrx sti 2011 (HIGH POLY)

USS-Reliant aus Star Trek 2 Zorn des Kahn Remington 700 SPS TACTICAL Futuristic Combat Jet Rigged Surveillance Camera Orb . SCION FRS 2013 (HIGH POLY)How to fix non-moving mmd parts/rigging tut Ekkoberry / / / / ©2012-2017 Ekkoberry So here you have a model you've put time and effort into editing.you open it up in MMD to test it out....and then this happens.Part of the hair decides it doesn't want to move.Okay so I've come across this problem quite a few times when making a model. This problem ususally occurs when you delete off a bone that something was attached to- in my case here, the hair had pigtails with bones in 'em. And becasue I deleted the bones off, this happened.Feel free to ask questions! but before you do, please read this tutorial first: [link]this also helps explaing the little * thingy I put in near the end. that slider circled can change how attached the vertices are to the bone.it's like percentages- 100/bright red is stuck completely, while 50/purple is only half stuck on.
By creating an account you agree to our terms of use and privacy policy.How to Create Realistic Rain How to use Dynamic PaintThe best particle settings for rainHow to use bump, mirror and color maps
single serve blender 51107c Dynamic Paint is here!
ninja blender bl 830 reviewsIn case you missed the hype, dynamic paint is a new feature in blender that allows objects to paint each other. This opens the door for things like animated snow footprints, smoke interaction, fluid wet maps and, you guessed it… rain! In this tutorial I will be showing you how to create realistic rain that interacts with it’s environment. If a rain sounds like a familar topic to you, that may be because I created a rain tutorial just 18 months ago. But I’m doing it again because the old tutorial didn’t include any interation with the environment.

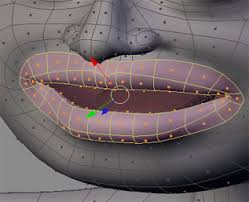
So I’m hoping you don’t mind a repeat :PLeave a comment or post it on Facebook or Twitter.Search results for "batman"Sort by Latest | Batman Bunny Pekena Nerdy Girl White batman symble hoodie IK STINK NAAR AARDAPPELEN Batman 1966 TV Swow Batman Telltale Mark 2 Dawn of Justice - Batman water junior batman 002 spiderman o spawn o batman for MiniMiniPekka or Aidan_916 fixed for MiniMiniPekka or Aidan_916 Pekena Gold Batman Gurl iYourDreamiWhether you’re a student or a professional animator, inevitably the time will come when you’ll need to tackle some sort of dialogue shot. With the need to create believable lip sync, on top of the rest of your character’s animation, its understandable why they are typically viewed as some of the hardest shots to tackle. It can seem overwhelming, but if you remember a few key principles, lip sync can quickly become one of the easiest things to do in a dialogue shot. So let’s breakdown some of the most important techniques for animating believable lip sync.

When animating lip sync your first instinct might be to try to pose out the mouth shape for every syllable that you hear in the audio. This is a common mistake and will cause your character’s jaw to open and close way more than it needs to. Instead, focus on the most important mouth shapes in the audio and blend over the rest. In reality this is how humans talk. Shoot some reference footage of yourself speaking the line and you’ll be surprised how little the jaw actually moves. Offset the lip sync for readability Offsetting lip sync is something that is often forgotten or overlooked, but it is important to take into account. With animation, its all about readability and lip sync is no exception. For your audience to be able to read the lip sync you’ll want to offset the jaw opening one to two frames before the audio is actually heard. If you have the jaw opening and closing each frame that the audio is heard your lip sync will feel like it’s just slightly ahead of the audio.

Hit those closed mouth shapes When it comes to mouth shapes some of the most important ones to hit properly are when the mouth is closed, like B, M, and P. You can’t blend over these because you need them to read clearly. To do that you’ll want to hold them for a couple frames, and pop open to the next mouth shape. For example, say your character is saying the word “but”. If you blend over the “B” shape it will look like the mouth is saying “ut.” To get the word to read properly, you’ll want to hold the “B” shape for 2 frames and then pop open to “ut.” Try it out and you’ll see the difference! If you are having trouble coming up with the right mouth shapes, try whipping out a mirror. Many times there is no better way to find the right shapes than to look at yourself for reference. Say the dialogue out loud. Study how your mouth is blending between shapes and what kind of pose it’s in for each word. If you wanted to take it a step further, try shooting video of yourself saying the dialogue and copy it to your computer to look at it frame-by-frame.

This way you can really see the different types of shapes and movements your mouth is doing for each word. Don’t be afraid to exaggerate When you think about it, lip sync typically happens very quickly. That’s why it is extremely important that you have enough exaggeration in there so your animation can be read properly by the audience. Listen closely to your audio and mark all the moments where the character is speaking louder, even if its just a slight adjustment. Once you have those identified, use those marks as moments to push the mouth shapes further. Exaggerate the mouth for shapes like “W” and “O” so it’ll be much easier to read. Have fun with it and remember you can always dial it back if you’ve gone too far. Next time you tackle a dialogue shot, try implementing these few techniques to help you create the killer lip sync that will truly enhance your shot and put it on the next level. If you want to see some of these techniques in action, check out the Facial Animation in Maya course.