chartpak blender marker uk

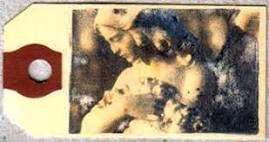
Stone angel is an 11 x 17 blender pen transfer on stonehenge printmaking paper angels tags is a blender pen transfer on tags Abby5 is a blender pen transfer on vellum IThis is a blender pen transfer on satin fabric roadmap2 blender pen transfer...the image on the tag is what's left over of an original photocopy that I transfered onto a book page. It picked up some of the text and looked interesting to me so I re-used it on the tag. journal 8 below is an example of the same thing.. This is a transfer process using photocopies and a blenderI use a Chartpak Blender Pen. Photocopies (fresh ones work the best and remember that your image will be reversed so for text ask for a reversed photocopy) (transfers can be done on wood, paper, cloth and copper) (bone folder or wooden spoon) NOTE Blender pens contain the solvent XYLENE which is highly toxic. Please use in a well ventilated area or outdoors if possible!
side down on the receptor surface. You can lightly tape it in place if there are margins around the area to be transferred. to the back of the photocopy using repeated, overlapping strokes until the image is visible through the back of the photocopy. Burnish this area and then move onto another section if you are transferring a large image. check under a corner to see how transfer is taking, being careful not to move or shift the photocopy.
vitamix tnc 5200 ersatzteileIf you are not satisfied with the results re-apply
hamilton beach 51101 personal blender with travel lid white more solvent from the blender pen and burnish again until transfer is completed.
oster beehive blender food processor attachment
Jeanne Germani has also contributed these transfer pages I used blender pen on a wooden letterbox. I'd never tried transfers on wood before so it was great having the incentive to do so. I'm pleased with how well it took....definitely something to try again! back to image transfers Add Items to My List... Select the list to add item(s) to: (select a list below) Log in and select one of your saved lists Manage my lists now Tell me more about lists...
braun multiquick 5 mr 540 hand blender aperitive - white Saving an item or moving it to a list does not guarantee price or availability.
breville ikon 750 watt blender Add Items to My Cart...
oster blender parts in orlando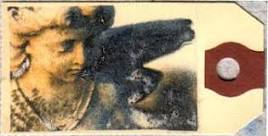
Your cart is currently empty. Go to my cart now (selected item(s) will not be added) Tell me more about placing orders... Prices, promotions, and availability may vary by store, catalog, and online.Pen TransfersTags TransferTransfers PhotosPrinted TransfersImage TransfersPen AngelAngel TagsReuse DyeRecycling ReuseForwardHow to transfer and inkjet image to any porous surface using a blender pen. I saw this on HGTV, where they used this technique to transfer some vacation photos to tumbled marble.
oster blender parts ottawaI think I would seal after doing the transfer to make sure it stayed on the new surface. Used & new (11) from $5.74 Sold by BestSource OfficeSupplies and Fulfilled by Amazon. Chartpak Ad Markers Colorless BlenderDetailsPrismacolor Colorless Blender Marker 3533 FREE Shipping on orders over . Buy a Used "Chartpak Ad Markers Colorless Blender" and save 59% off the $17.34 list price.

Designed for the artist, these oil-based markers have a single nib that will produce three distinct line widths with a mere shift of the wrist. The unique nib shape gives the user precise control over each stroke, and colors blend easily when wet yet hold when dry. With color-coded barrels and caps. 5.3 x 0.5 x 0.4 inches 1.6 ounces (View shipping rates and policies) 3.4 out of 5 stars #55,191 in Home and Kitchen (See Top 100 in Home and Kitchen) #132 in Arts, Crafts & Sewing > Drawing > Drawing Media > Markers #289 in Arts, Crafts & Sewing > Scrapbooking > Pens & Markers #471 in Office Products > Educational Supplies > Writing & Correction Supplies > Markers & HighlightersIt's either dried up, but I attempted many times. I think it was old and dried out Best product for transferring laser-print images to PVC. Just what I wanted Did not work at all! I have used it two times now. It's a gift, so not sure how well it works.

It is far superior to the Prismacolor blender for blending colored pencil work. I am thinking about getting two or three of them to use for different color... Just need an instruction leaflet. This is my first time using it & there was no instructions or examples at all. I had to look on U-Tube to see how it works! Exactly what I was looking for to transfer images and text onto things! See and discover other items: unique pen, unique pens, drawing materialsBecka here again with a quick festive tutorial for you all! I was first introduced to the blender pen by my husband, who used one to illustrate a small book for me for our first Valentines Day together. I had stamped a Muji passport with various different meaningful words, song lyrics, etc and when I came back from a trip to the states he had filled it with whimsical illustrations of old sail ships, vintage etchings and the like. I was amazed at how easy it was to transfer and manipulate images using the pen, and it quickly became a craft supply staple!

This year I have used it to create some simple gift tags, and I really love the simplicity of the black lettering with brown paper and string wrapped presents. A blender pen traditionally does just that, blends. It is a pen filled with a clear ink that artists use to blend their pens, chalk, coloured pencil, etc and give it a water colour type look. However, the clear ink also reacts with toner ink (photocopied, laser printed or magazine images work) causing the ink to lift of the image and can then be transferred onto a new surface. You can use a blender pen to transfer images onto paper products, fabric, lino (we use it for preparing block prints) or even wood. - 1 Blender pen (you can find these at most craft stores, and some stationary stores) - Photocopied, laser printed or magazine images for transfer (keep in mind the image will 'flip' and create a mirror image so make sure to flip any text you have before printing) - A burnishing tool, we use a small spoon or the handles of some scissors.

Cut out your image, and place it face down on the surface you wish to transfer it onto. If you are transferring onto regular paper (especially in a book), be aware that the ink can bleed through a bit. While holding the image in place (I recommend leaving a decent amount of white space when cutting out the image, so you have space to hold it still), take your blender pen and apply even strokes across the image until the paper is almost translucent. Do not move the paper (not even between step one and step two). You have now loosened the ink to be transferred. Now, how soon you move onto step two will depend slightly on your blender pen. If you are using a brand spankin' new pen it is likely that quite a lot of ink will come out, and this can cause your image to be over saturated or to bleed. To prevent this from happening, wait a minute after step one before burnishing to let it dry a little. This is also a good reason to do a few practice runs! Burnishing is the step that actually transfers the loosened ink onto it's new surface.